|
Well we have been up & down while being forwards & backwards amidst going left & right. In turn, we've really have been all over the place over the last eight months! However, in the end it's all good! Here's some of the highlights of our past eight months back in Indiana. We started our farm business in April. Our no-till farm field this year was just a bit over 1/16th of an acre, roughly 2,500 square feet. It hasn't been as fruitful as we had hoped this year due to numerous possible factors. However, we have begun adding on to the field already for next years growing season with the anticipation that we will be growing on 1/8th of an acre. We have been able to setup & sell our produce & baked levain products at a total of 33 farmers markets this season! Additionally, we have begun clearing pathways for easier access to our back acres. These paths will enable us to begin thinning some trees out over the winter. In turn, we can work on fencing in areas so we can have goats & sheep on the farm in the next couple years! Our plan for the upcoming winter months, in addition to loads of home improvement projects, is to further educate ourselves on beekeeping & maple syrup production. With that being said we attended The Beekeepers of Indiana Fall Beekeeping School last Saturday to assist in growing our knowledge of beekeeping! We plan on adding bees & thus harvesting honey as well as collecting sap from our sugar maple trees & producing maple syrup as early as next year! One of our biggest accomplishments in the last two months has been building our chicken coop and getting our chickens! We searched online, bought a book, & mulled over many designs. Ultimately, this DIY Chicken Tractor Plan is what we chose to emulate. Here's a couple reasons we choose this coop design in particular. First off, we like that this coop is on wheels & thus off the ground & portable. Secondly, the open bottom, chicken wire floor, allows the chickens droppings to fall to the ground for fertilizer thus helping maintain a cleaner coop in the warmer months as well as assists in keeping the hens healthy. Lastly, it's the perfect size for the amount of hens we anticipated & now have. If you are ever entertaining the idea to build your own chicken coop, please consider following the plans that we based our coop off of, or you could use our plans! Here are the supplies that we used in building our coop:
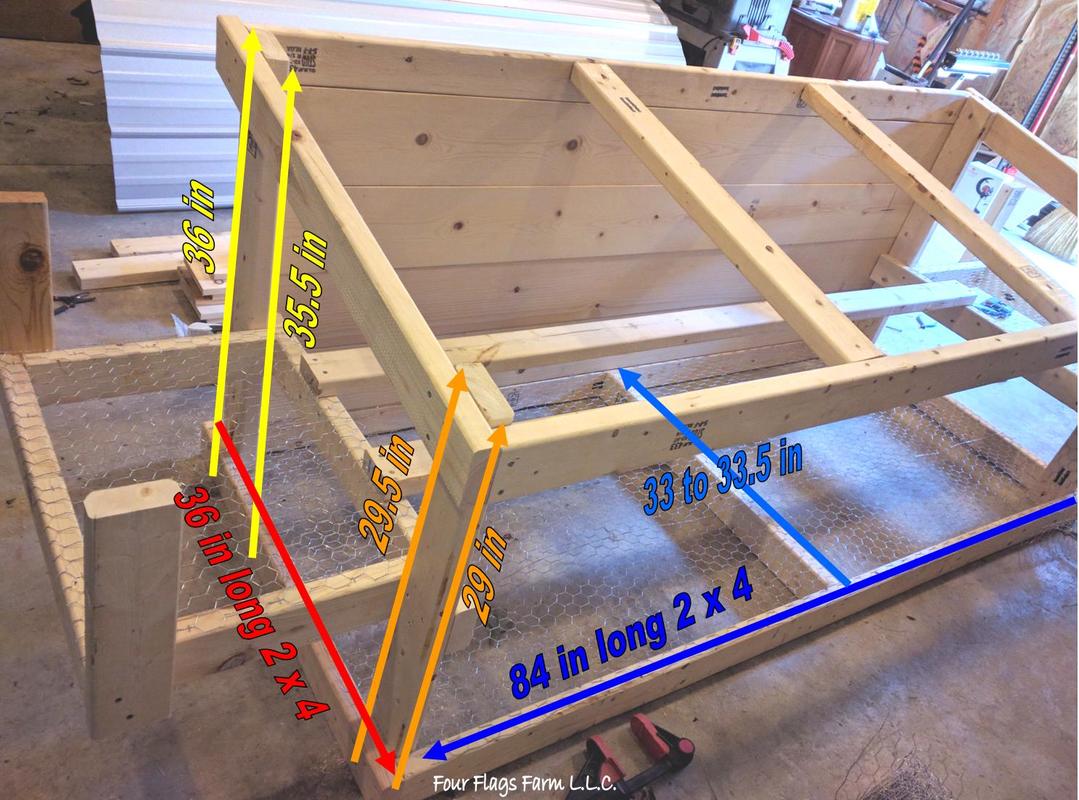
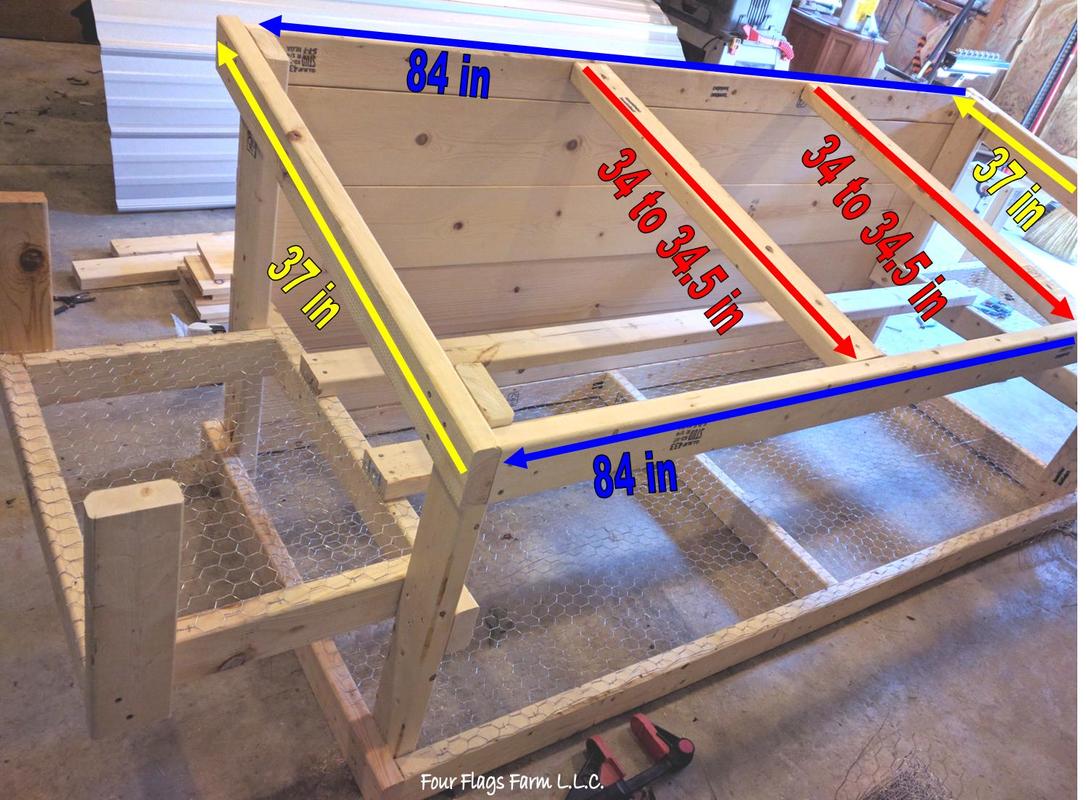
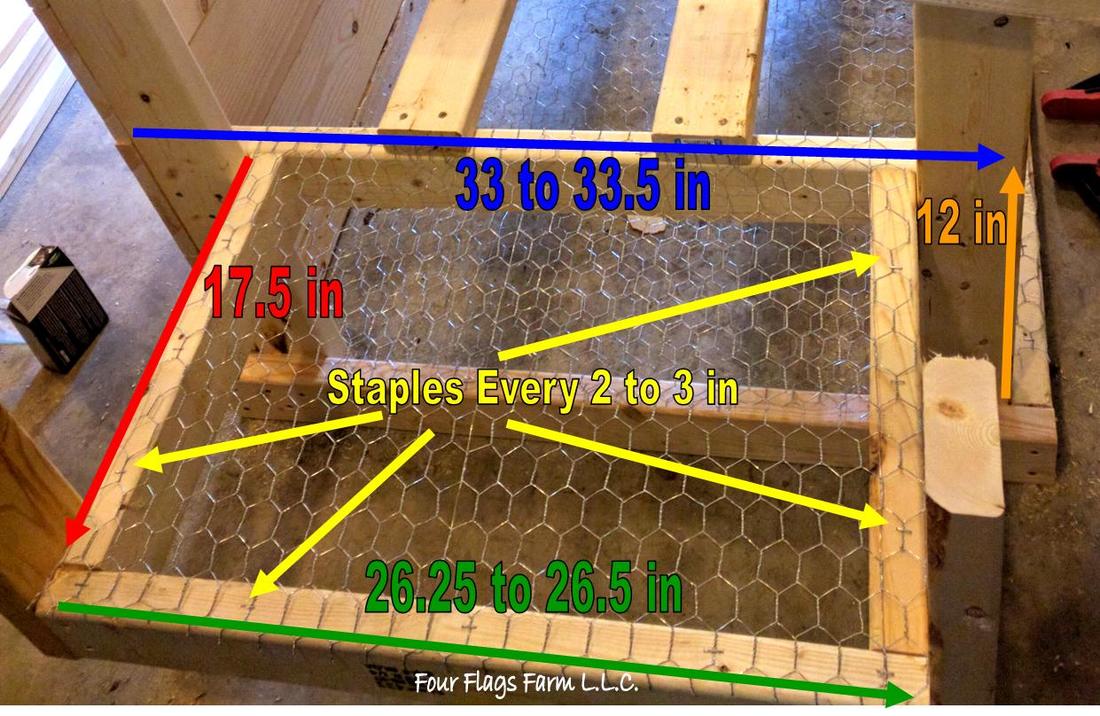
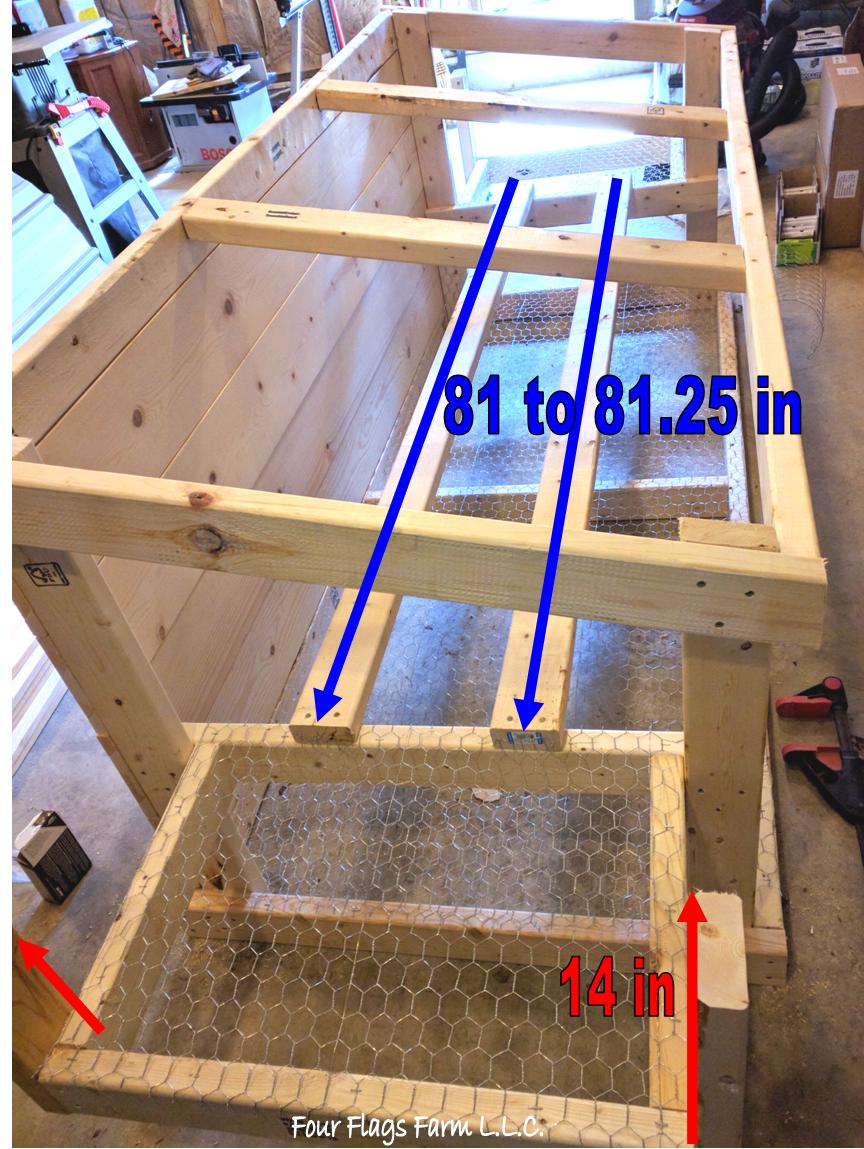
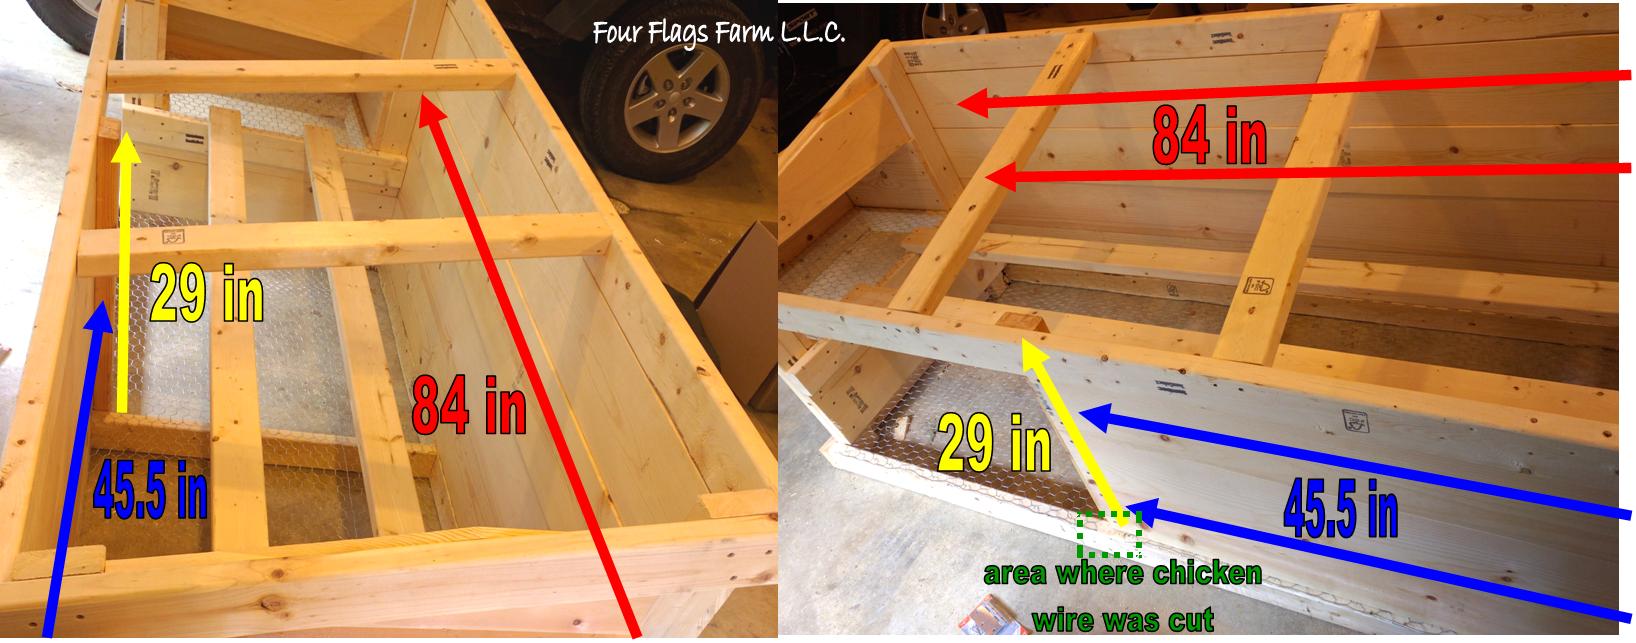
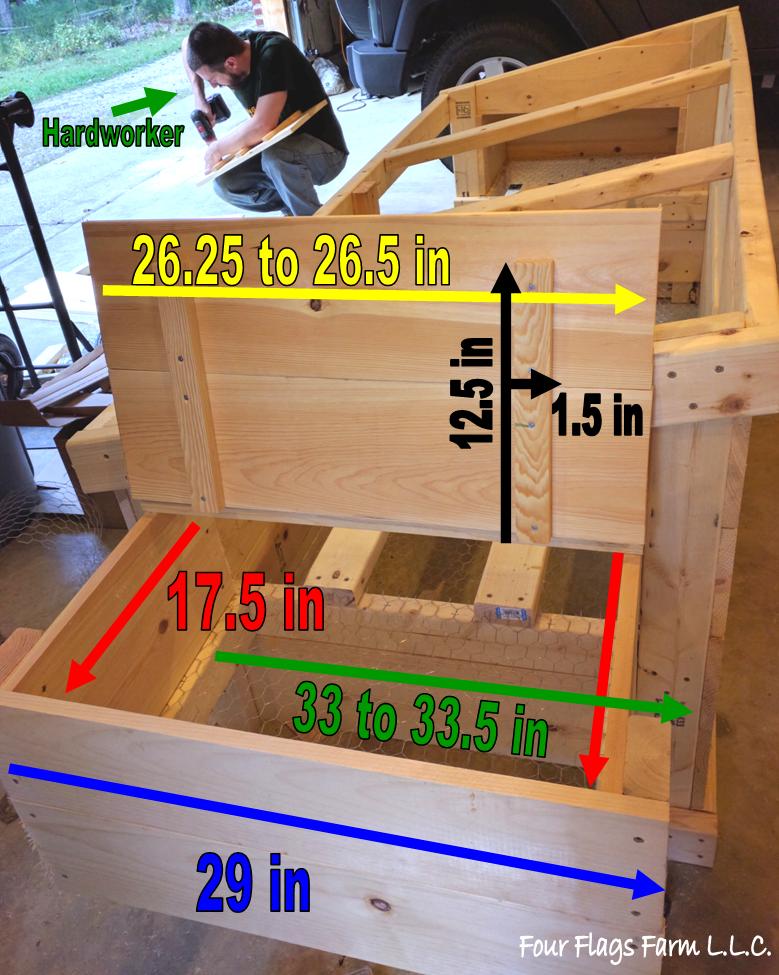
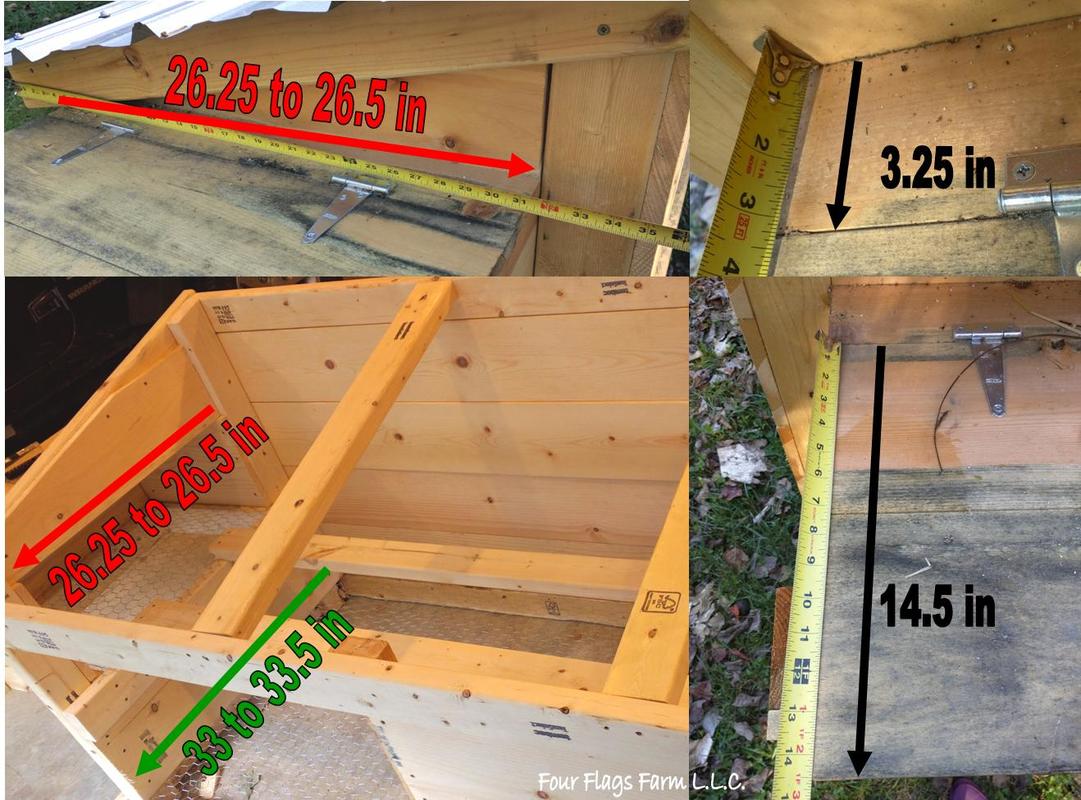
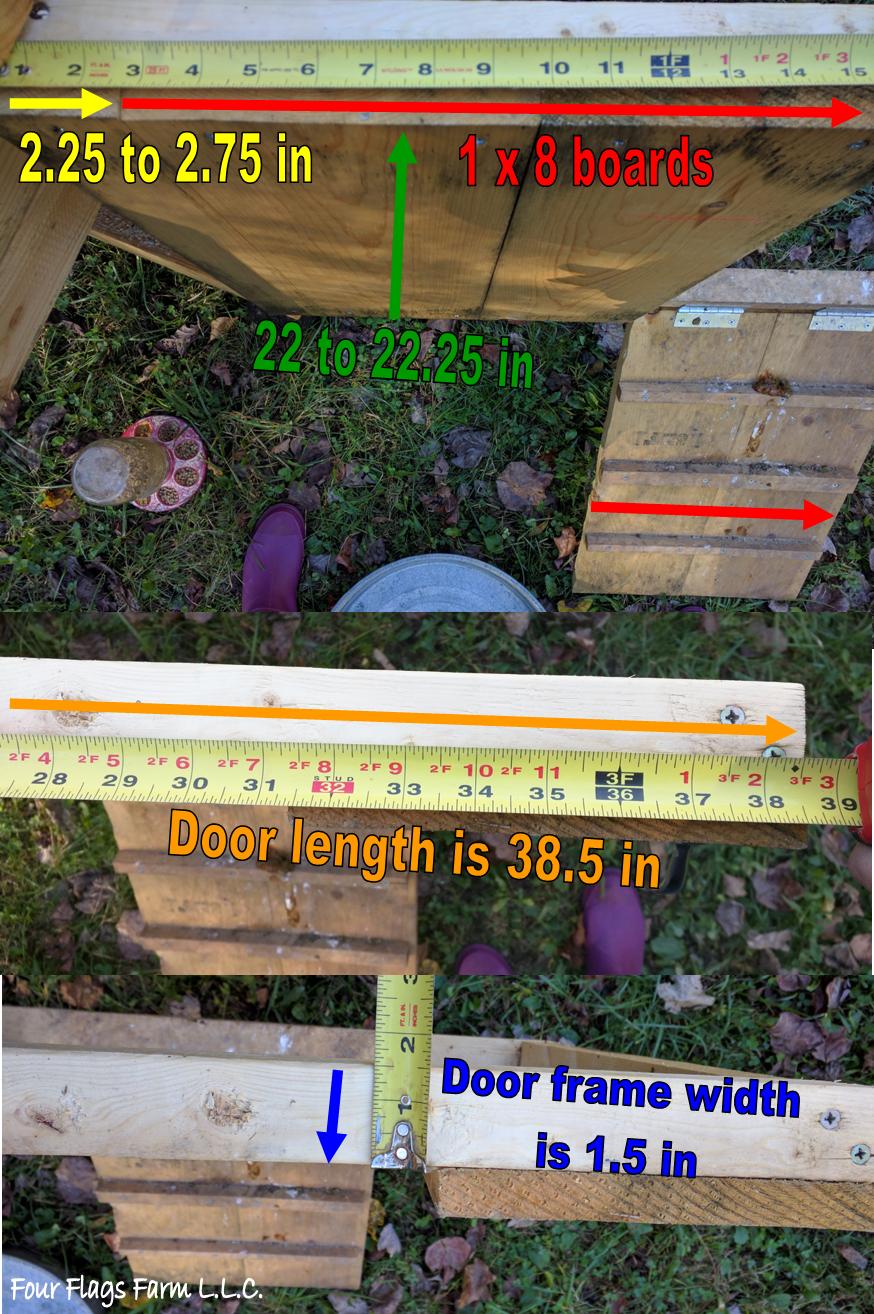
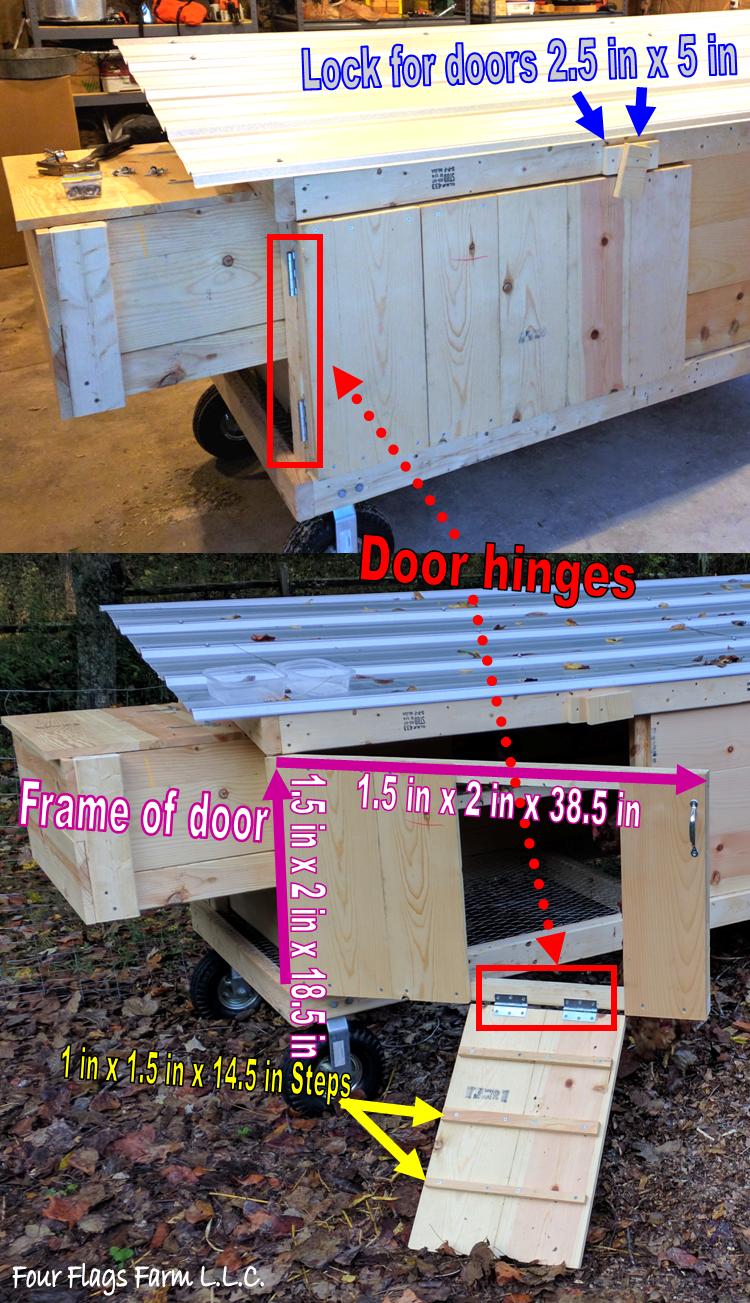
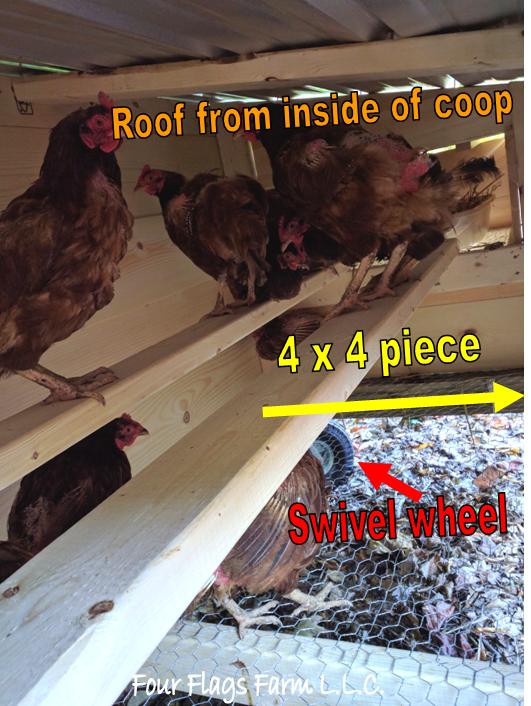
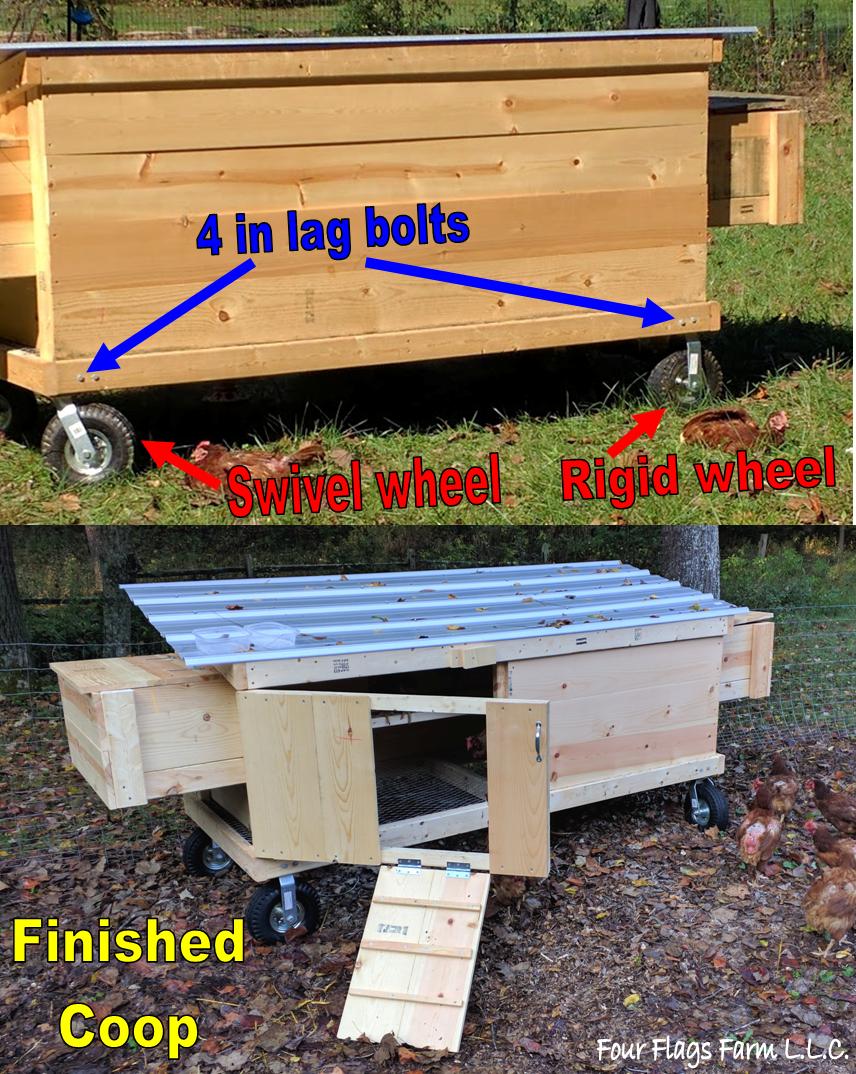
Step 1. Building bottom frame of the chicken coop. Cut 2 x 4's to build the frame of the coop that measures 3 ft x 7 ft. You'll need two pieces measuring 36 in, 3 ft, & two pieces measuring 84 in, 7 ft. Assemble the bottom four 2 x 4's using two of the 2 1/2 inch long deck screws at each corner. Additionally, you'll need to measure the width between the two 84 in long boards once the four frame boards are screwed in place to determine the length of the middle support board. This length should be between 33 to 33.5 inches. Once you've cut the board to length screw it between the two 84 in long boards in the middle of the frame using two of the deck screws at each end. Step 2. Measure, cut, & add the four corner supports. Since this coop has a slopped roof you'll need two longer pieces measuring 36 in, 3 feet, & angling down to 35.5 inches & two shorter pieces measuring 29.5 in then angling down to 29 in. Secure these four corner post to the inside of the bottom frame 2 x 4's using the deck screws. The following photo outlines the boards listed in step 1 & 2. Step 3. Cut two 2 X 4 boards that are 84 in in length & two that are 37 in long. These are the top outside frame boards. Screw these boards to the top of the corner frame boards using two deck screws at each corner. Step 4. Measure the width between the top two 81 inch long boards. It will measure between 34 to 34.5 in. Cut two 2 x 4 board pieces to this length. Attach them 1/3 & 2/3rd's lengthwise down the 81 in boards on the top frame. The following photo outlines the boards listed in steps 3 & 4. Step 5. Start building nesting boxes. Measure the length from one corner frame post to the end of the other corner frame post at the end of the coop & repeat making this measurement for the other end of the chicken coop. Your measurement should be between 33 to 33.25 in long. Cut two 2 x 4 pieces to your measured lengths for each end of the coop. Secure these two pieces to the inside of the end corner posts so that the top of the 33 to 33.25 in long boards are 12 in from the tops of the bottom frame boards. Additionally, cut four 2 x 4 board pieces measuring 17.5 inches long. Secure these two pieces to the boards you just screwed down to the corner posts. Lastly, for this step you need to measure the length horizontally between the two 17.5 in boards you just attached. This length should be between 26.25 to 26.5 in. You'll need to cut two more 2 x 4's to this length. Once you attach those two boards, one to each end of each nesting box, with the deck screws you're finished with this step! Step 6. Adding poultry netting (a.k.a. chicken wire or chicken fencing). We stretched the chicken wire out on top of the 2 x 4's making up the bottom on the chicken coop frame. Thankfully the chicken wire was already 3 feet wide so we didn't have to cut two of the four sides on the floor of the coop. We cut the chicken wire to length using the wire cutter we have. We stapled the wire in place, stapling every 2-3 in, using the 3/8 in long staples. Additionally, we cut & stapled the chicken wire to the tops of the bottom frames for the nesting boxes. The following photo outlines the boards & chicken wire stapling listed in steps 5 & 6. Step 7. Adding the side supports to the nesting boxes. Cut four 2 x 4 board pieces 14 in long. Using two screws per 14 in piece secure these support posts to the outside sides of the nesting boxes. Step 8. Adding roosting bars. Measure the length from the inside of the bottom frames on the nest boxes. This length should be between 78.25 to 78.5 in. Cut two 2 x 4 board pieces to the measured length. Secure these roosting bar pieces to the tops of the bottom boards of the nesting boxes using two screws per piece per end. The following photo outlines the boards attached in steps 7 & 8. Step 9. Congratulations you've finished the chicken coop frame! Now time to add the siding. Measure the length from one of the long vertical corner posts to the other. This measurement should be 84 in. You'll need to cut four 1 x 6 boards 84 in long. These four boards will be attached on the back, the side with the long vertical posts, to the corner frame posts using two deck screws for each end of the boards. Step 10. Siding the front of the coop. Since this is the side with the door on it you only have to put siding on the area where the door doesn't cover. You'll need to measure the vertical length between the top & bottom of the front 2 x 4 frame. This length should be roughly 29 in. Cut out one 2 x 4 board to this length. This vertical, door opening, board goes flush against the middle framing board on the bottom of the coop. You will need to trim a bit of chicken wire with the wire cutters on the bottom to attach this board to the bottom frame board. Secure this board vertically between the top & bottom front 2 x 4 frame on the back of those boards with deck screws. This is where the pictures really come in handy to clear up what needs to happen. Now you'll need to measure the longest length between the vertical board you just installed & the vertical framing boards. This length should be close to 45.5 in. You'll need to cut three of the 1 x 8 boards to this length. Secure these three boards horizontally with deck screws to the vertical end frame board & the vertical door opening board. The following photos outline the boards & chicken wire stapling listed in steps 9 & 10. Step 11. Siding the ends of the chicken coop & nesting boxes. Again, the pictures are going to be extremely useful in determining how these steps are constructed. Additionally, please be sure to measure all of the openings on your coop prior to marking & cutting your boards to ensure your boards are cut to fit your coop. You'll need eight total of the 1 x 8 boards, four for each nesting box, cut to a length of 17.5 in for the sides of the nesting boxes. These boards are secured to the nesting box frame from the inside of the boxes using the deck screws. You'll need four of the 1 x 8 boards, two for each nesting box, cut to a length of 29 in for the end pieces on the nesting boxes. These boards are secured to the nesting box frame from the outside of the boxes using the deck screws. Now for siding the ends of the chicken coop you'll need for under the nesting boxes two pieces of 1 x 8 cut to a length of 33 to 33.5 in. You will also need two pieces of 1 x 8 that are 33 to 33.5 in long but trimmed down to a width of 1.25 to 1.5 in. The last pieces to cut & attach are the 26.25 to 26.5 in long top siding board pieces. It's best to cut this 1 x 8 board to length & then dry fit the board in place which then allows you to mark the angle to be cut. Once you cut the angle on this piece the board is ready to be screwed in place using the deck screws from the inside of the chicken coop. Step 12. Building & attaching the nesting box lids. Cut a 1 x 8 board to 26.25 to 26.5 in, be sure to measure your opening to get a precise fit. You'll then cut this board in half. You'll attach one of the 3.25 in pieces to each of the nesting boxes at where the boxes meet the siding. You'll then need to build & attach the lids of the nesting boxes. The lids to the nesting boxes are comprised of two 1 x 8 boards cut to the 26.25 to 26.5 in length. These boards are fastened together with a cross piece of 1 x 8 that has been cut to 1.5 in wide & 12.5 in long & three deck screws. Using the gate hinges attach the two doors that you've built to the nesting boxes as shown in the photos below. The following photos show what was completed in steps 11 & 12. Step 13. Onward & upward to building the coop doors! For the door frame you'll need to cut two pieces that are 1.5 in wide, 2 in high, & 38.5 in long & two pieces that are 1.5 in wide, 2 in high, & 18.5 in long. Secure together these four frame pieces using deck screws. You'll then work on assembling the door from the right to the left. The first board to attach to the door is a 1 x 8 board that has been cut to a length of 22 to 22.25 in, measure to get your exact board length prior to cutting. Attach this board to the far right of the door frame so that is is flush with the door frame using deck screws at the top & bottom of the board. Add the door handle to this piece of board. Additionally, you'll then need to cut five more 1 x 8 pieces to the same length as the first piece you just cut. Next, we're going to build the drop down door ramp for the chickens to easily enter & exit the coop without the big coop door being open. You'll be using 2 of the 1 x 8 pieces you just cut to length & you'll need to cut 3 step pieces that are 1 in high, 1.5 in wide, & 14.5 in long. Attach the 3 step pieces to the two 1 x 8 board pieces using the deck screws as shown in the photos below. Now you can attach the drop down door ramp to the coop door frame. You'll need to use the two 3 in square hinges & deck screws to attach the drop down door ramp to the coop at the bottom of the door frame. Taking two of the the remaining three 1 x 8 pieces that you cut to the length of 22 to 22.5 in attach them next to the drop down door ramp on the coop door frame using deck screws. Lastly, you'll need to measure the space left from the door frame to the last 1 x 8 piece you attached to the coop door frame. This space should be between 2.25 to 2.75 in. You'll need to cut your last a 1 x 8 board that was cut to length & cut it to match your measured width. Attach this last board to the coop door using deck screws. Step 14. Attaching the coop door & adding the lock. Using the 3 1/2 in square hinges & deck screws to attach the coop door to the coop on the left side of the door frame. It's easiest to do this with two people & with the coop laying with it's back on the ground. Additionally, make sure the door is level when attaching it or you'll have problems opening & closing the door. We used two pieces of wood to fashion a lock for the coop door. You could choose to use a hasp & padlock, bolt lock, or whatever suits your fancy & we did discuss these as options. However, we decided to use wood since we had plenty on hand & this lock is plenty easy to construct! You'll need to cut two pieces of the leftover 1 x 8 boards to measure a length of 5 in & a width of 2.5 in. Using two deck screws attach on the the pieces to the frame of the chicken coop so that it is centered between the first & second boards on the door to the coop. You'll then use one deck screw to attach the second piece to the middle of the first lock piece that you just attached to the coop. Only attaching it with one screw will allow it to turn & thus become the lock for the coop door! The following photos show what was completed in steps 13 & 14. Step 15. Adding the wheels. First of all, we want to apologize for not having any photos of the wheels being installed. It was a two person job & we were so ready to get the coop finished that we forgot to take pictures of our process. To get started you will need to turn the coop upside down. Once this is done then you'll need to cut the 4 x 4 into two 3 foot long pieces. You will then attach the two 4 x 4 pieces of lumber inside the ends of the bottom frame of the coop using the eight 4 in long lag bolts, two lag bolts for each end of each piece. Next you will attach the wheels to the two 4 x 4 pieces using the sixteen 3 in long lag bolts & 1 in washers. Be sure to put the two rigid wheels on one end & the two swivel wheels on the other end so you can steer the coop using these wheels. Once those are all attached you can turn the coop back over so that it is resting on the wheels. Step 16. The final step which is to add the roof! This was by far the easiest step. Place the sheet metal roof panel on top of the coop so that it covers the coop evenly. Attach the roof to the chicken coop frame using the sheet metal screws. Voilà! Project complete! The following photos show what was completed in the final steps of the chicken coop construction! This project took us roughly two weeks working around 1 to 1.5 hours per day in the evenings to build. In turn, it probably took us 20-22 hours to build. It was completely worth the money, time, & effort it took to build this coop. We intend make use of this coop for many years for housing our hens!
We hope that you have enjoyed reading about our adventures over the last eight months back in Indiana & exploring how we built our chicken coop! Until next time we wish you peace, love, & sunshine always from Four Flags Farm! Comments are closed.
|
Welcome!We are Four Flags Farm, Armonda & Ben Riggs! Archives
February 2022
Categories |
 RSS Feed